


مشخصات مقاله
-
497
-
0.0
-
2241
-
0
-
0
آموزش Tiles در Spring MVC
MVC Tiles
MVC tiles در Spring
مثال MVC tile ها در Spring
Spring پشتیبانی یکپارچه با فریمورک apache tiles ارائه می کند. بنابراین، با کمک پشتیبانی tile های Spring، به سادگی می توان چیدمان برنامه کاربردی MVC Spring را مدیریت کرد.
مزیت های پشتیبانی tile در Spring MVC
- قابلیت استفاده مجدد: میتوان یک جز مجزا را در تعداد متعددی صفحه مجددا استفاده کرد، مانند اجزای پاورقی و سرورقی(header and footer).
- کنترل متمرکز: میتوان تنها با استفاده از یک صفحه قالب(single template page) چیدمان صفحه را کنترل کرد.
- سادگی در تغییر چیدمان: با کمک یک صفحه قالب، میتوان در هر زمان چیدمان صفحه را تغییر داد. بنابراین، وب سایت شما فناوری های جدید مانند bootstrap ، jQuery و غیره را به سادگی میتواند بپذیرد.
ساختار دایرکتوری
فایل های مثال spring tiles در eclipse را با هم ببینیم.
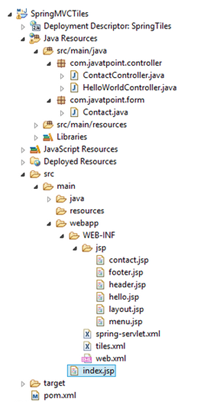
مثال MVC tiles در Spring
1- وابستگی ها را به فایل pom.xml اضافه کنید.
pom.xml
< !-- https://mvnrepository.com/artifact/org.springframework/spring-webmvc -->
< dependency>
     < groupId>org.springframework< /groupId>
     < artifactId>spring-webmvc< /artifactId>
     < version>5.1.1.RELEASE< /version>
< /dependency>
   < !-- https://mvnrepository.com/artifact/javax.servlet/javax.servlet-api -->
< dependency>
     < groupId>javax.servlet< /groupId>
     < artifactId>servlet-api< /artifactId>
     < version>3.0-alpha-1< /version>
< /dependency>
     < !-- https://mvnrepository.com/artifact/javax.servlet/jstl -->
< dependency>
     < groupId>javax.servlet< /groupId>
     < artifactId>jstl< /artifactId>
     < version>1.2< /version>
< /dependency>
< !-- https://mvnrepository.com/artifact/org.apache.tomcat/tomcat-jasper -->
< dependency>
     < groupId>org.apache.tomcat< /groupId>
     < artifactId>tomcat-jasper< /artifactId>
     < version>9.0.12< /version>
<  /dependency>
  < !-- https://mvnrepository.com/artifact/org.apache.tiles/tiles-jsp -->
<  dependency>
     < groupId>org.apache.tiles< /groupId>
     < artifactId>tiles-jsp< /artifactId>
     < version>3.0.5< /version>
< /dependency>

     < !-- https://mvnrepository.com/artifact/org.apache.tiles/tiles-servlet -->
< dependency>
     < groupId>org.apache.tiles< /groupId>
     < artifactId>tiles-servlet< /artifactId>
     < version>3.0.5< /version>
< /dependency>
     < !-- https://mvnrepository.com/artifact/org.apache.tiles/tiles-core -->
< dependency>
     < groupId>org.apache.tiles< /groupId>
     < artifactId>tiles-core< /artifactId>
     < version>3.0.5< /version>
< /dependency>
    < !-- https://mvnrepository.com/artifact/org.apache.tiles/tiles-el -->
< dependency>
     < groupId>org.apache.tiles< /groupId>
     < artifactId>tiles-el< /artifactId>
     < version>3.0.5< /version>
< /dependency>
2- کلاس bean را ایجاد کنید.
Contact.java
package com.javatpoint.form;
public class Contact {
    private String firstname;
    private String lastname;
    private String email;
    private String telephone;

    public String getEmail() {
        return email;
    }
    public String getTelephone() {
        return telephone;
    }
    public void setEmail(String email) {
        this.email = email;
    }
    public void setTelephone(String telephone) {
        this.telephone = telephone;
    }
    public String getFirstname() {
        return firstname;
    }
    public String getLastname() {
        return lastname;
    }
    public void setFirstname(String firstname) {
        this.firstname = firstname;
    }
    public void setLastname(String lastname) {
        this.lastname = lastname;
    }

}
3- کلاس کنترلر را ایجاد کنید.
HelloWorldController.java
package com.javatpoint.controller;
import org.springframework.stereotype.Controller;
import org.springframework.ui.Model;
import org.springframework.web.bind.annotation.RequestMapping;
@Controller
public class HelloWorldController {
    @RequestMapping("/hello")
    public String helloWorld(Model m) {
        String message = "Hello World, Spring MVC @ Javatpoint";
        m.addAttribute("message", message);
        return "hello";
    }
}
ContactController.java
package com.javatpoint.controller;
import org.springframework.stereotype.Controller;
import org.springframework.ui.Model;
import org.springframework.validation.BindingResult;
import org.springframework.web.bind.annotation.ModelAttribute;
import org.springframework.web.bind.annotation.RequestMapping;
import org.springframework.web.bind.annotation.RequestMethod;
import org.springframework.web.bind.annotation.SessionAttributes;
import com.javatpoint.form.Contact;
@Controller
@SessionAttributes
public class ContactController {
    @RequestMapping(value = "/addContact", method = RequestMethod.POST)
    public String addContact(@ModelAttribute("contact") Contact contact, BindingResult result) {
        //write the code here to add contact
        return "redirect:contact.html";
    }

    @RequestMapping("/contact")
    public String showContacts(Model m) {
        m.addAttribute("command", new Contact());
        return "contact";
    }
}
4- ورودی کنترلر را در فایل web.xml ارائه دهید.
web.xml
< ?xml version="1.0" encoding="UTF-8" ?>

< web-app xmlns:xsi="http://www.w3.org/2001/XMLSchema-instance" xmlns="http://java.sun.com/xml/ns/javaee" xsi:schemaLocation="http://java.sun.com/xml/ns/javaee http://java.sun.com/xml/ns/javaee/web-app_2_5.xsd" id="WebApp_ID" version="2.5">
   < display-name>SpringTiles< /display-name>
   < welcome-file-list>
      < welcome-file>index.jsp< /welcome-file>
   < /welcome-file-list>
   < servlet>
     < servlet-name>spring< /servlet-name>
     < servlet-class>
             org.springframework.web.servlet.DispatcherServlet
         < /servlet-class>
     < load-on-startup>1< /load-on-startup>
   < /servlet>
   < servlet-mapping>
     < servlet-name>spring< /servlet-name>
     < url-pattern>*.html< /url-pattern>
   < /servlet-mapping>
< /web-app>
5- Bean را در فایل xml تعریف کنید.
spring-servlet.xml
< beans xmlns="http://www.springframework.org/schema/beans"
xmlns:xsi="http://www.w3.org/2001/XMLSchema-instance"
xmlns:p="http://www.springframework.org/schema/p"
xmlns:context="http://www.springframework.org/schema/context"
xsi:schemaLocation="http://www.springframework.org/schema/beans
                    http://www.springframework.org/schema/beans/spring-beans-3.0.xsd
                    http://www.springframework.org/schema/context
                    http://www.springframework.org/schema/context/spring-context-3.0.xsd">

< context:annotation-config />

< context:component-scan base-package="com.javatpoint.controller" />

< bean id="viewResolver" class="org.springframework.web.servlet.view.tiles3.TilesViewResolver" />

< bean id="tilesConfigurer" class="org.springframework.web.servlet.view.tiles3.TilesConfigurer">
< property name="definitions">
< list>
< value>/WEB-INF/tiles.xml< /value>
< /list>
< /property>
< /bean>
< /beans>
6- فایل tiles.xml را ارائه دهید.
tiles.xml
< ?xml version="1.0" encoding="UTF-8" ?>

< !DOCTYPE tiles-definitions PUBLIC
"-//Apache Software Foundation//DTD Tiles Configuration 2.0//EN"
"http://tiles.apache.org/dtds/tiles-config_2_0.dtd">

< tiles-definitions>
     < definition name="base.definition"
                   7. template="/WEB-INF/jsp/layout.jsp">
         < put-attribute name="title" value="" />

         < put-attribute name="header" value="/WEB-INF/jsp/header.jsp" />

         < put-attribute name="menu" value="/WEB-INF/jsp/menu.jsp" />

         < put-attribute name="body" value="" />

         < put-attribute name="footer" value="/WEB-INF/jsp/footer.jsp" />

     < /definition>
     < definition name="contact" extends="base.definition">
         < put-attribute name="title" value="Contact Manager" />

         < put-attribute name="body" value="/WEB-INF/jsp/contact.jsp" />

     < /definition>

     < definition name="hello" extends="base.definition">
         < put-attribute name="title" value="Hello Spring MVC" />

         < put-attribute name="body" value="/WEB-INF/jsp/hello.jsp" />

     < /definition>

< /tiles-definitions>
7- صفحه درخواست شده را ایجاد کنید.
index.jsp
< a href="hello.html">Hello Spring< /a> |
< a href="contact.html">Contact< /a>
8- سایر اجزای منظر را ایجاد کنید.
hello.jsp
< html>
< head>
     < title>Spring MVC Example< /title>
< /head>
< body>
< h1>Welcome to Spring MVC< /h1>
     < p>Message is: ${message}< /p>
< /body>
< /html>
contact.jsp
< %@taglib uri="http://www.springframework.org/tags/form" prefix="form"%>
< html>
< head>
     < title>Spring Tiles Contact Form< /title>
< /head>
< body>
< h2>Contact Manager< /h2>
< form:form method="post" action="addContact.html">

     < table>
     < tr>
          < td>< form:label path="firstname">First Name< /form:label>< /td>
          < td>< form:input path="firstname" />< /td>
     < /tr>
     < tr>
          < td>< form:label path="lastname">Last Name< /form:label>< /td>
          < td>< form:input path="lastname" />< /td>
     < /tr>
     < tr>
          < td>< form:label path="lastname">Email< /form:label>< /td>
          < td>< form:input path="email" />< /td>
     < /tr>
     < tr>
          < td>< form:label path="lastname">Telephone< /form:label>< /td>
          < td>< form:input path="telephone" />< /td>
     < /tr>
     < tr>
          < td colspan="2">
               < input type="submit" value="Add Contact" />

          < /td>
     < /tr>
< /table>

< /form:form>
< /body>
< /html>
header.jsp
< h2>Header< /h2>
< hr />
footer.jsp
< hr />

< p>Copyright  2010-2014 javatpoint.com.< /p>
menu.jsp
< p>Menu 1< /p>
< p>Menu 2< /p>
layout.jsp
< %@ taglib uri="http://tiles.apache.org/tags-tiles" prefix="tiles"%>
< !DOCTYPE HTML PUBLIC "-//W3C//DTD HTML 4.01 Transitional//EN"
             3. "http://www.w3.org/TR/html4/loose.dtd">

< html>
< head>
< meta http-equiv="Content-Type" content="text/html; charset=UTF-8">

< title>< tiles:insertAttribute name="title" ignore="true" />< /title>
< /head>
< body>
         < div>< tiles:insertAttribute name="header" />< /div>
         < div style="float:left;padding:10px;width:15%;">< tiles:insertAttribute name="menu" />< /div>
         < div style="float:left;padding:10px;width:80%;border-left:1px solid pink;">
         < tiles:insertAttribute name="body" />< /div>
         < div style="clear:both">< tiles:insertAttribute name="footer" />< /div>

< /body>
< /html>
خروجی :
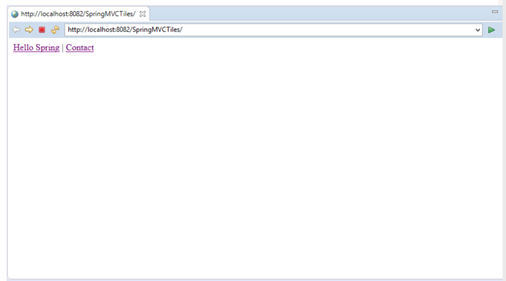
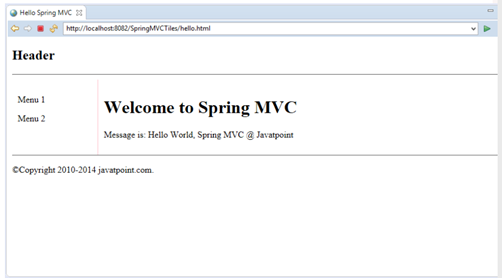
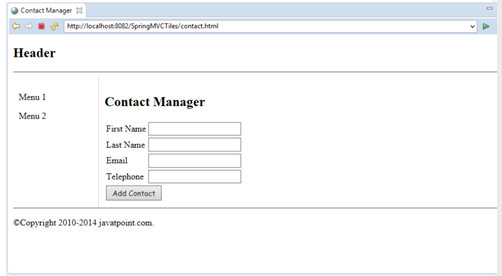
اگر از maven استفاده نمی کنید، فایل tiles jar را دانلود کنید.