


مشخصات مقاله
-
512
-
0.0
-
2271
-
0
-
0
ساخت برنامه Login سفارشی امنیت در Java Spring
Login به سیستم سفارشی (custom login) امنیت Spring
Login به سیستم سفارشی امنیت Spring
امنیت Spring ماژول Login به سیستم داخلی خود را برای احراز هویت کاربر ارائه می کند. این ماژول اطلاعات کاربر را اعتبار سنجی می کند و دسترسی به برنامه را فراهم می کند. صفحه Login به سیستم رندر (render) شده توسط متد داخلی است. نیاز به ایجاد صفحه jsp جدید نداریم. اما اگر بخواهیم صفحه Login را سفارشی کنیم چگونه می توان این کار را کرد؟
پاسخ این است که می توانیم صفحه Login در قالب jsp خود را ایجاد و آن را با برنامه ادغام کنیم. در این بخش یک صفحه Login به سیستم سفارشی ایجاد می کنیم و از آن برای Login استفاده می کنیم.
یک مثال می بینیم. یک پروژه maven با جزییات زیر ایجاد کنید.

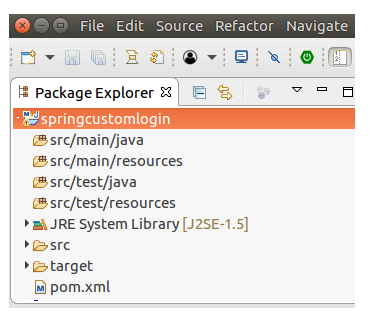
پس از اتمام، ساختار پروژه زیر را ایجاد می کند.
پیکربندی امنیت
پروژه را برای اعمال امنیت Spring، پیکربندی کنید. به چهار فایل زیر نیاز داریم. پکیج com.javatpoint را ایجاد کنید و این فایل ها را در آن قرار دهید.
// AppConfig.java
package com.javatpoint;

import org.springframework.context.annotation.Bean;
import org.springframework.context.annotation.ComponentScan;
import org.springframework.context.annotation.Configuration;
import org.springframework.web.servlet.config.annotation.EnableWebMvc;
import org.springframework.web.servlet.view.InternalResourceViewResolver;
import org.springframework.web.servlet.view.JstlView;
@EnableWebMvc
@Configuration
@ComponentScan({ "com.javatpoint.controller.*" })
public class AppConfig {
    @Bean
    public InternalResourceViewResolver viewResolver() {
        InternalResourceViewResolver viewResolver
                          = new InternalResourceViewResolver();
        viewResolver.setViewClass(JstlView.class);
        viewResolver.setPrefix("/WEB-INF/views/");
        viewResolver.setSuffix(".jsp");
        return viewResolver;
    }
}
// MvcWebApplicationInitializer.java
package com.javatpoint;

import org.springframework.web.servlet.support.AbstractAnnotationConfigDispatcherServletInitializer;
public class MvcWebApplicationInitializer extends
        AbstractAnnotationConfigDispatcherServletInitializer {
    @Override
    protected Class[] getRootConfigClasses() {
        return new Class[] { WebSecurityConfig.class };
    }
    @Override
    protected Class[] getServletConfigClasses() {
        // TODO Auto-generated method stub
        return null;
    }
    @Override
    protected String[] getServletMappings() {
        return new String[] { "/" };
    }
}
// SecurityWebApplicationInitializer.java
package com.javatpoint;
  import org.springframework.security.web.context.*;

  public class SecurityWebApplicationInitializer
      extends AbstractSecurityWebApplicationInitializer {

  }
// WebSecurityConfig.java
package com.javatpoint;

import org.springframework.context.annotation.*;
//import org.springframework.security.config.annotation.authentication.builders.*;
import org.springframework.security.config.annotation.web.builders.HttpSecurity;
import org.springframework.security.config.annotation.web.configuration.*;
import org.springframework.security.core.userdetails.*;
//import org.springframework.security.core.userdetails.UserDetailsService;
import org.springframework.security.provisioning.InMemoryUserDetailsManager;
import org.springframework.security.web.util.matcher.AntPathRequestMatcher;
import org.springframework.web.servlet.config.annotation.WebMvcConfigurer;
@EnableWebSecurity
@ComponentScan("com.javatpoint")
public class WebSecurityConfig extends WebSecurityConfigurerAdapter {

@Bean
public UserDetailsService userDetailsService() {
    InMemoryUserDetailsManager manager = new InMemoryUserDetailsManager();
    manager.createUser(User.withDefaultPasswordEncoder()
    .username("irfan").password("khan123").roles("ADMIN").build());
    return manager;
}

@Override
protected void configure(HttpSecurity http) throws Exception {

      http.authorizeRequests().
      antMatchers("/index", "/user","/").permitAll()
      .antMatchers("/admin").authenticated()
      .and()
      .formLogin()
      .loginPage("/login")
      .and()
      .logout()
      .logoutRequestMatcher(new AntPathRequestMatcher("/logout"));
}
}
ببینید در متد پیکربندی، پس از formLogin() یک متد loginPage ("/login") استفاده شده است. این متد اصلی برای فراخوانی صفحه Login سفارشی است.
منظر (view)
در ابتدا صفحه Login خود را ایجاد کنید. بر اساس Spring رسمی، صفحه Login باید مشابه زیر باشد.
// login.jsp
< %@ taglib prefix="c" uri="http://java.sun.com/jsp/jstl/core" %>
< c:url value="/login" var="loginUrl" />

< form action="$ {loginUrl}" method="post">
    < c:if test="$ {param.error != null}">
         < p>
              Invalid username and password.
         < /p>
    < /c:if>
    < c:if test="$ {param.logout != null}">
         < p>
              You have been logged out.
         < /p>
    < /c:if>
    < p>
         < label for="username">Username< /label>
         < input type="text" id="username" name="username" />

    < /p>
    < p>
         < label for="password">Password< /label>
         < input type="password" id="password" name="password" />

    < /p>
    < input type="hidden"
name="$ {_csrf.parameterName}"
value="$ {_csrf.token}" />

    < button type="submit" class="btn">Log in< /button>
< /form>
// index.jsp
< html>
< head>
< title>Home Page< /title>
< /head>
< body>
< h3> Welcome to Javatpoint! < br> < /h3>
< a href="admin">Login here< /a>
< /body>
< /html>
// admin.jsp
< html>
< head>
< meta http-equiv="Content-Type" content="text/html; charset=UTF-8">

< title>Home Page< /title>
< /head>
< body>
L ogin Successful!
< a href="logout">logout< /a>
< /body>
< /html>
کنترلر
یک کنترلر HomeController درون پکیج com.javatpoint.controller ایجاد کنید.
// HomeController.java
package com.javatpoint.controller;
import org.springframework.stereotype.Controller;
import org.springframework.web.bind.annotation.RequestMapping;
import org.springframework.web.bind.annotation.RequestMethod;
@Controller
public class HomeController {

    @RequestMapping(value="/", method=RequestMethod.GET)
    public String index() {

        return "index";
    }
    @RequestMapping(value="/login", method=RequestMethod.GET)
    public String login() {

        return "login";
    }
    @RequestMapping(value="/admin", method=RequestMethod.GET)
    public String admin() {

        return "admin";
    }
}
وابستگی های پروژه
// pom.xml
< project xmlns="http://maven.apache.org/POM/4.0.0" xmlns:xsi="http://www.w3.org/2001/XMLSchema-instance" xsi:schemaLocation="http://maven.apache.org/POM/4.0.0 http://maven.apache.org/xsd/maven-4.0.0.xsd">
   < modelVersion>4.0.0< /modelVersion>
   < groupId>com.javatpoint< /groupId>
   < artifactId>springcustomlogin< /artifactId>
   < version>0.0.1-SNAPSHOT< /version>
   < packaging>war< /packaging>
   < properties>
     < maven.compiler.target>1.8< /maven.compiler.target>
     < maven.compiler.source>1.8< /maven.compiler.source>
< /properties>
< dependencies>
  < dependency>
            < groupId>org.springframework< /groupId>
            < artifactId>spring-webmvc< /artifactId>
            < version>5.0.2.RELEASE< /version>
        < /dependency>
        < dependency>
        < groupId>org.springframework.security< /groupId>
        < artifactId>spring-security-web< /artifactId>
        < version>5.0.0.RELEASE< /version>
    < /dependency>
< dependency>
     < groupId>org.springframework.security< /groupId>
     < artifactId>spring-security-core< /artifactId>
     < version>5.0.4.RELEASE< /version>
< /dependency>
     < !-- https://mvnrepository.com/artifact/org.springframework.security/spring-security-config -->
< dependency>
     < groupId>org.springframework.security< /groupId>
     < artifactId>spring-security-config< /artifactId>
     < version>5.0.4.RELEASE< /version>
< /dependency>


         < !-- https://mvnrepository.com/artifact/javax.servlet/javax.servlet-api -->
< dependency>
     < groupId>javax.servlet< /groupId>
     < artifactId>javax.servlet-api< /artifactId>
     < version>3.1.0< /version>
     < scope>provided< /scope>
< /dependency>
< dependency>
     < groupId>javax.servlet< /groupId>
     < artifactId>jstl< /artifactId>
     < version>1.2< /version>
< /dependency>
< /dependencies>
   < build>
     < plugins>
          < plugin>
               < groupId>org.apache.maven.plugins< /groupId>
               < artifactId>maven-war-plugin< /artifactId>
               < version>2.6< /version>
               < configuration>
                    < failOnMissingWebXml>false< /failOnMissingWebXml>
               < /configuration>
          < /plugin>
     < /plugins>
< /build>
< /project>
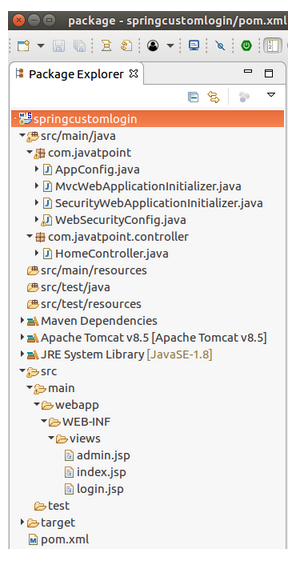
ساختار پروژه
پروژه ما شبیه این خواهد بود.
سرور را اجرا کنید
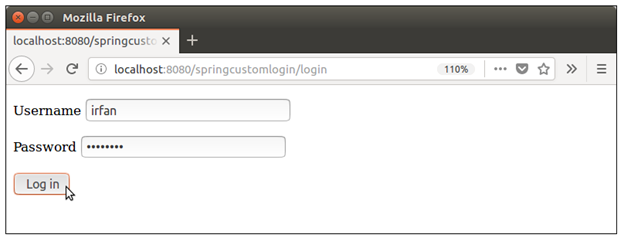
خروجی :

حال با ارائه اطلاعات کاربر وارد سیستم شوید.
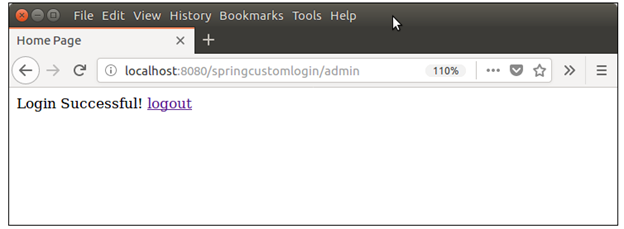
ببینید، به خوبی کار می کند. حال، می توان آن را متناسب با نیاز سفارشی کرد.
این مثال را دانلود کنید.