مشخصات مقاله
-
1752
-
0.0
-
3629
-
0
-
0
تست تعامل بین چندین کامپوننت نرم افزاری لایه ی UI اپلیکیشن با استفاده از فریم ورک UI Automator به روش black-box
تست تعامل بین چندین کامپوننت نرم افزاری اپلیکیشن با استفاده از فریم ورک UI Automator
آموزش حاضر به شما می آموزد چگونه حتی برای اپلیکیشن هایی که source code آن ها را در دست ندارید، تست هایی به روش black-box طراحی کنید.
تست تعامل بین کامپوننت های نرم افزاری اپلیکیشن به روش blackbox
استفاده از UI Automator جهت تست تعامل بین کامپوننت های اپلیکیشن (تست کل اپلیکیشن)
در مبحث حاضر تمامی کامپوننت های رابط کاربری اپلیکیشن به روش black box (functional) مورد تست قرار می گیرد.
SDK (مجموعه ابزار توسعه و طراحی اپلیکیشن) اندروید یک کتابخانه ی مبتنی بر جاوا به نام uiautomator دارد که به وسیله ی آن توسعه دهنده قادر خواهد بود تست نرم افزاری برای کامپوننت های UI اپلیکیشن نوشته و نیز با ارائه ی یک موتور امکان اجرای این تست ها را فراهم می آورد. لازم به ذکر است که برای استفاده از هر دو ابزار مزبور، بایستی ویرایش 4.3 اندروید (ورژن 18 توابع کتابخانه ای اندروید/API level) بر روی دستگاهی که تست بر روی آن اجرا می شود، نصب باشد.
کتابخانه ی uiautomator با ارائه ی کلاس های UiDevice، UiSelector و کلاس UiObject که بر اساس کلاس UiSelector ساخته می شود، به ترتیب قابلیت های زیر را در اختیار توسعه دهنده قرار می دهد:
- تبادل داده و تعامل با دستگاه میزبان
- پیدا کردن المان ها در نمایشگر
- ساخت آبجکت های تشگیل دهنده ی ظاهر برنامه و لایه ی UI
دو کلاس UiCollection و UiScrollable نیز به ترتیب این اجازه را می دهند تا چندین المان UI را همزمان انتخاب کرده و جهت دسترسی به المان مورد نظر در view پیمایش نماید.
دسترسی به اطلاعات مربوط به view با ابزار uiautomatorviewer
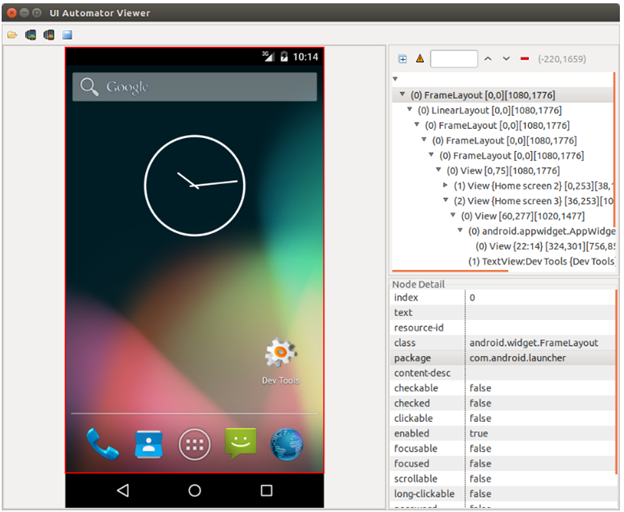
چارچوب نرم افزاری اندروید ابزاری به نام uiautomatorviewer را ارائه می دهد که به وسیله ی آن شما قادر خواهید بود لایه ی UI یک اپلیکیشن را به راحتی تجزیه و تحلیل کنید. شما می توانید با استفاده از این ابزار اندیس، متن یا attribute اپلیکیشن را پیدا کنید. در واقع این ابزار به شما امکان می دهد تا به نمودار درختی (layout hierarchy) المان های رابط کاربری دسترسی داشته و property های مربوط به هریک از کنترل ها (المان های رابط کاربری) را مشاهده نمایید.
به واسطه ی این ابزار حتی افرادی که در نوشتن اپلیکیشن شرکت نداشته یا برنامه نویس نیستند نیز می توانند به راحتی برنامه را تحلیل کرده و برای آن تست طراحی کنند. این را در تصویر زیر مشاهده می کنید.
به منظور اجرای ابزار uiautomatorviewer، پس از ارائه ی آدرس android-sdk/tools/ در خط فرمان، دستور uiautomatorviewer را درج نمایید.
دسترسی و استفاده از UI Automator برای تست اپلیکیشن
انجام تنظیمات لازم در پروژه
برای استفاده از ابزار UI Automator جهت اجرای تست بر روی اپلیکیشن، کتابخانه (dependency) زیر را به فایل build.gradle پروژه اضافه نموده و AndroidJUnitRunner را به عنوان مقدار به پارامتر testInstrumentationRunner پاس دهید. در زیر این مثال را به صورت کاربردی مشاهده می کنید.
apply plugin: 'com.android.application'
android {
    compileSdkVersion 19
    buildToolsVersion "23.0.0"
    defaultConfig {
        applicationId "com.vogella.android.test.uiautomator"
        minSdkVersion 19
        targetSdkVersion 23
        versionCode 1
        versionName "1.0"
        testInstrumentationRunner "android.support.test.runner.AndroidJUnitRunner"
    }
    buildTypes {
        release {
            minifyEnabled false
            proguardFiles getDefaultProguardFile('proguard-android.txt'), 'proguard-rules.pro'
        }
    }
}
dependencies {
    androidTestCompile 'com.android.support.test:runner:0.3'
    androidTestCompile 'junit:junit:4.12'
    testCompile 'junit:junit:4.12'
    androidTestCompile 'org.hamcrest:hamcrest-library:1.3'
    androidTestCompile 'com.android.support.test:runner:0.3'
    androidTestCompile 'com.android.support.test:rules:0.3'
    androidTestCompile 'com.android.support.test.uiautomator:uiautomator-v18:2.1.1'
}
توصیه می شود جهت جلوگیری از بروز اختلال، انیمیشن را بر روی دستگاه اندرویدی که تست در بستر آن اجرا می شود، غیر فعال نمایید.
محل قرارگیری تست ها
تست های مبتنی بر UI Automator می بایست به صورت پیش فرض در پوشه ی app/src/androidTest جایگذاری شود.
نحوه ی نوشتن تست
تست های UI Automator می بایست با دستور @RunWith(AndroidJUnit4.class) نشانه گذاری شده و با استفاده از نمونه ی کلاس ActivityTestRule خود را تنظیم نمایند.
ساخت پروژه و تنظیم فایل Gradle build
یک پروژه ی جدید که اسم پوشه ی بالایی آن (top level project name) com.example.android.testing.uiautomator می باشد، ایجاد نمایید.
فایل Gradle build را به صورت زیر ویرایش نمایید.
apply plugin: 'com.android.application'
android {
    compileSdkVersion 19
    buildToolsVersion "23.0.0"
    defaultConfig {
        applicationId "com.vogella.android.test.uiautomator"
        minSdkVersion 19
        targetSdkVersion 23
        versionCode 1
        versionName "1.0"
        testInstrumentationRunner "android.support.test.runner.AndroidJUnitRunner"
    }
    buildTypes {
        release {
            minifyEnabled false
            proguardFiles getDefaultProguardFile('proguard-android.txt'), 'proguard-rules.pro'
        }
    }
}
dependencies {
    androidTestCompile 'com.android.support.test:runner:0.3'
    androidTestCompile 'junit:junit:4.12'
    testCompile 'junit:junit:4.12'
    androidTestCompile 'org.hamcrest:hamcrest-library:1.3'
    androidTestCompile 'com.android.support.test:runner:0.3'
    androidTestCompile 'com.android.support.test:rules:0.3'
    androidTestCompile 'com.android.support.test.uiautomator:uiautomator-v18:2.1.1'
}
ایجاد تست
تستی با پیاده سازی زیر را در پوشه ی _androidTest تعریف نمایید.
package com.vogella.android.test.uiautomator;
import android.content.Intent;
import android.content.pm.PackageManager;
import android.content.pm.ResolveInfo;
import android.support.test.InstrumentationRegistry;
import android.support.test.rule.ActivityTestRule;
import android.support.test.runner.AndroidJUnit4;
import android.support.test.uiautomator.By;
import android.support.test.uiautomator.UiDevice;
import android.support.test.uiautomator.UiObject;
import android.support.test.uiautomator.UiObjectNotFoundException;
import android.support.test.uiautomator.UiScrollable;
import android.support.test.uiautomator.UiSelector;
import android.support.test.uiautomator.Until;
import org.hamcrest.Matchers;
import org.junit.Before;
import org.junit.Rule;
import org.junit.Test;
import org.junit.runner.RunWith;
import static org.hamcrest.Matchers.*;
import static org.junit.Assert.*;
@RunWith(AndroidJUnit4.class)
public class MyUiAutomatorTest {
    @Rule
    public ActivityTestRule mActivityRule
            = new ActivityTestRule(MainActivity.class);
    private UiDevice mDevice;
    @Before
    public void setUp() {
        // Initialize UiDevice instance
        mDevice = UiDevice.getInstance(InstrumentationRegistry.getInstrumentation());
        // Start from the home screen
        mDevice.pressHome();
        mDevice.wait(Until.hasObject(By.pkg(getLauncherPackageName()).depth(0)), 1000);
    }
    @Test
    public void checkSettings() throws UiObjectNotFoundException {
        // Simulate a short press on the HOME button.
        mDevice.pressHome();
        // We’re now in the home screen. Next, we want to simulate
        // a user bringing up the All Apps screen.
        // If you use the uiautomatorviewer tool to capture a snapshot
        // of the Home screen, notice that the All Apps button’s
        // content-description property has the value “Apps”. We can
        // use this property to create a UiSelector to find the button.
        UiObject allAppsButton = mDevice.findObject(new UiSelector().description("Apps"));
        // Simulate a click to bring up the All Apps screen.
        allAppsButton.clickAndWaitForNewWindow();
        // In the All Apps screen, the Settings app is located in
        // the Apps tab. To simulate the user bringing up the Apps tab,
        // we create a UiSelector to find a tab with the text
        // label “Apps”.
        UiObject appsTab = mDevice.findObject(new UiSelector().text("Apps"));
        // Simulate a click to enter the Apps tab.
        appsTab.click();
        // Next, in the apps tabs, we can simulate a user swiping until
        // they come to the Settings app icon. Since the container view
        // is scrollable, we can use a UiScrollable object.
        UiScrollable appViews = new UiScrollable(
                new UiSelector().scrollable(true));
        // Set the swiping mode to horizontal (the default is vertical)
        appViews.setAsHorizontalList();
        // create a UiSelector to find the Settings app and simulate
        // a user click to launch the app.
        UiObject settingsApp = appViews
                .getChildByText(new UiSelector()
                                .className(android.widget.TextView.class.getName()),
                        "Settings");
        settingsApp.clickAndWaitForNewWindow();
        // Validate that the package name is the expected one
        UiObject settingsValidation = new UiObject(
                new UiSelector()
                        .packageName("com.android.settings"));
        assertThat(settingsValidation.exists(), equalTo(true));
    }
    private String getLauncherPackageName() {
        // Create launcher Intent
        final Intent intent = new Intent(Intent.ACTION_MAIN);
        intent.addCategory(Intent.CATEGORY_HOME);
        // Use PackageManager to get the launcher package name
        PackageManager pm = InstrumentationRegistry.getContext().getPackageManager();
        ResolveInfo resolveInfo = pm.resolveActivity(intent, PackageManager.MATCH_DEFAULT_ONLY);
        return resolveInfo.activityInfo.packageName;
    }
}
اجرا و بررسی صحت اجرای موفقیت آمیز تست
تست را اجرا کرده و از عملکرد صحیح آن اطمینان حاصل نمایید.