مشخصات مقاله
-
412
-
0.0
-
1488
-
0
-
0
آموزش MVC Pagination Example-Java Spring
مثال MVC Pagination
مثال MVC Pagination در اسپرینگ
مثال MVC CURD در اسپرینگ
از صفحه بندی (Pagination) برای نمایش تعداد زیادی رکورد در بخش های متفاوت استفاده می شود. در این مورد، 10، 20 یا 50 رکورد در یک صفحه. برای رکوردهای باقی مانده، لینک فراهم می کنیم.
به سادگی می توانیم مثال صفحه بندی در MVC اسپرینگ ایجاد کنیم. در این مثال صفحه بندی، از پایگاه داده MySQL برای واکشی رکوردها استفاده می کنیم.
یک جدول ایجاد کنید یا فایل SQL را وارد کنید. در اینجا جدول "emp" را در پایگاه داده "test" ایجاد کردیم. جدول emp دارای سه فیلد است: شناسه، نام و حقوق. یک جدول ایجاد کنید و رکوردها را به صورت دستی وارد کنید یا فایل SQL ما را وارد کنید.
مثال MVC Pagination در اسپرینگ
1- وابستگی ها را به فایلpom.xml اضافه کنید.
pom.xml
1 2 3 4 5 6 7 8 9 10 11 12 13 14 15 16 17 18 19 20 21 22 23 24 25 26 27 28 29 30 31 32 33 34 35 36 37 38 | < dependency> < groupId>org.springframework< /groupId> < artifactId>spring-webmvc< /artifactId> < version>5.1.1.RELEASE< /version> < /dependency> < dependency> < groupId>org.apache.tomcat< /groupId> < artifactId>tomcat-jasper< /artifactId> < version>9.0.12< /version> < /dependency> < dependency> < groupId>javax.servlet< /groupId> < artifactId>servlet-api< /artifactId> < version>3.0-alpha-1< /version> < /dependency> < dependency> < groupId>javax.servlet< /groupId> < artifactId>jstl< /artifactId> < version>1.2< /version> < /dependency> < dependency> < groupId>mysql< /groupId> < artifactId>mysql-connector-java< /artifactId> < version>8.0.11< /version> < /dependency> < dependency> < groupId>org.springframework< /groupId> < artifactId>spring-jdbc< /artifactId> < version>5.1.1.RELEASE< /version> < /dependency> <button></button> |
2- کلاس bean را ایجاد کنید.
در اینجا کلاس bean شامل متغیرهای (علاوه بر متدهای getter و setter) متناظر با فیلدهای موجود در پایگاه داده است.
Emp.java
1 2 3 4 5 6 7 8 9 10 11 12 13 14 15 16 17 18 19 20 21 22 23 24 25 26 27 28 | package com.javatpoint.beans; public class Emp { private int id; private String name; private float salary; public int getId() { return id; } public void setId(int id) { this.id = id; } public String getName() { return name; } public void setName(String name) { this.name = name; } public float getSalary() { return salary; } public void setSalary(float salary) { this.salary = salary; } } <button></button> |
3- کلاس کنترلر را ایجاد کنید.
در کلاس کنترلر، نماد @PathVariableپارامتر متد را با یک URL موقتی محدود می کند. برای مثال:
1 2 | @RequestMapping(value="/viewemp/{pageid}")<button></button> |
در اینجا براکت {} دربردارنده مقدار موقتی است.
EmpController.java
1 2 3 4 5 6 7 8 9 10 11 12 13 14 15 16 17 18 19 20 21 22 23 24 25 26 27 28 | package com.javatpoint.controllers; import java.util.List; import org.springframework.beans.factory.annotation.Autowired; import org.springframework.stereotype.Controller; import org.springframework.ui.Model; import org.springframework.web.bind.annotation.PathVariable; import org.springframework.web.bind.annotation.RequestMapping; import com.javatpoint.beans.Emp; import com.javatpoint.dao.EmpDao; @Controller public class EmpController { @Autowired EmpDao dao; @RequestMapping(value="/viewemp/{pageid}") public String edit(@PathVariable int pageid,Model m){ int total=5; if(pageid==1){} else{ pageid=(pageid-1)*total+1; } System.out.println(pageid); List< Emp> list=dao.getEmployeesByPage(pageid,total); m.addAttribute("msg", list); return "viewemp"; } }<button></button> |
4-کلاس DAO را ایجاد کنید.
یک کلاس DAO برای دسترسی به داده مورد نیاز از پایگاه داده ایجاد کنید.
EmpDao.java
1 2 3 4 5 6 7 8 9 10 11 12 13 14 15 16 17 18 19 20 21 22 23 24 25 26 27 28 29 30 | package com.javatpoint.dao; import java.sql.ResultSet; import java.sql.SQLException; import java.util.List; import org.springframework.jdbc.core.JdbcTemplate; import org.springframework.jdbc.core.RowMapper; import com.javatpoint.beans.Emp; public class EmpDao { JdbcTemplate template; public void setTemplate(JdbcTemplate template) { this.template = template; } public List<emp> getEmployeesByPage(int pageid,int total){ String sql="select * from emp limit "+(pageid-1)+","+total; return template.query(sql,new RowMapper<emp>(){ public Emp mapRow(ResultSet rs, int row) throws SQLException { Emp e=new Emp(); e.setId(rs.getInt(1)); e.setName(rs.getString(2)); e.setSalary(rs.getFloat(3)); return e; } }); } } </emp></emp><button></button> |
5-ورودی کنترلر را در فایل web.xml ارائه دهید.
web.xml
1 2 3 4 5 6 7 8 9 10 11 12 13 14 15 | < ?xml version="1.0" encoding="UTF-8" ?> < web-app xmlns:xsi="http://www.w3.org/2001/XMLSchema-instance" xmlns="http://java.sun.com/xml/ns/javaee" xsi:schemaLocation="http://java.sun.com/xml/ns/javaee http://java.sun.com/xml/ns/javaee/web-app_3_0.xsd" id="WebApp_ID" version="3.0"> < display-name>SpringMVC< /display-name> < servlet> < servlet-name>spring< /servlet-name> < servlet-class>org.springframework.web.servlet.DispatcherServlet< /servlet-class> < load-on-startup>1< /load-on-startup> < /servlet> < servlet-mapping> < servlet-name>spring< /servlet-name> < url-pattern>/< /url-pattern> < /servlet-mapping> < /web-app> <button></button> |
6-Bean را در فایلxml تعریف کنید.
spring-servlet.xml
1 2 3 4 5 6 7 8 9 10 11 12 13 14 15 16 17 18 19 20 21 22 23 24 25 26 27 28 29 30 31 32 33 34 35 36 | < ?xml version="1.0" encoding="UTF-8" ?> 6. xsi:schemaLocation="< context:component-scan base-package="com.javatpoint.controllers">< /context:component-scan> < bean class="org.springframework.web.servlet.view.InternalResourceViewResolver"> < property name="prefix" value="/WEB-INF/jsp/">< /property> < property name="suffix" value=".jsp">< /property> < /bean> < bean id="ds" class="org.springframework.jdbc.datasource.DriverManagerDataSource"> < property name="driverClassName" value="com.mysql.jdbc.Driver">< /property> < property name="username" value="">< /property> < property name="password" value="">< /property> < /bean> < bean id="jt" class="org.springframework.jdbc.core.JdbcTemplate"> < property name="dataSource" ref="ds">< /property> < /bean> < bean id="dao" class="com.javatpoint.dao.EmpDao"> < property name="template" ref="jt">< /property> < /bean> < /beans><button></button> |
7-صفحه درخواست شده را ایجاد کنید.
index.jsp
1 2 3 4 5 6 7 8 | < !DOCTYPE html> < html> < body> < a href="viewemp/1">View Employees< /a> < /body> < /html> <button></button> |
8-اجزای منظر را ایجاد کنید.
viewemp.jsp
1 2 3 4 5 6 7 8 9 10 11 12 13 14 15 16 17 18 19 20 21 22 23 24 | <%@ taglib uri="http://java.sun.com/jsp/jstl/core" prefix="c"%> < !DOCTYPE html PUBLIC "-//W3C//DTD HTML 4.01 Transitional//EN" "http://www.w3.org/TR/html4/loose.dtd"> < html> < body> < h1>Employees List< /h1> < table border="2" width="70%" cellpadding="2"> < tr>< th>Id< /th>< th>Name< /th>< th>Salary< /th>< /tr> < c:forEach var="emp" items="${msg}"> < tr> < td>${emp.id}< /td> < td>${emp.name}< /td> < td>${emp.salary}< /td> < /tr> < /c:forEach> < /table> < br /> < a href="/SpringMVCPaginationExample/viewemp/1">1< /a> < a href="/SpringMVCPaginationExample/viewemp/2">2< /a> < a href="/SpringMVCPaginationExample/viewemp/3">3< /a> < /body> < /html><button></button> |
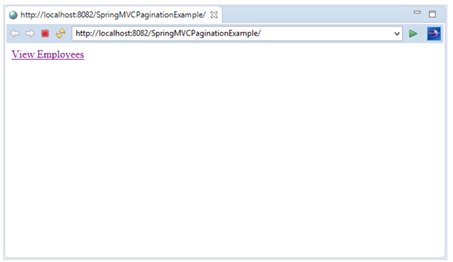
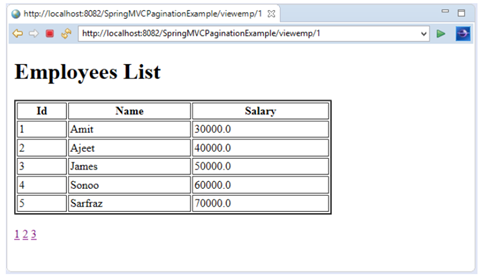
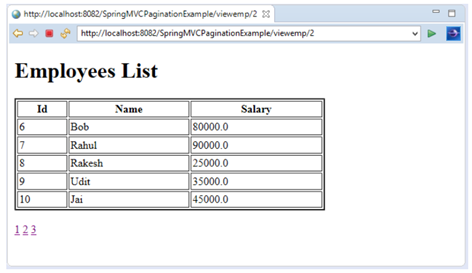
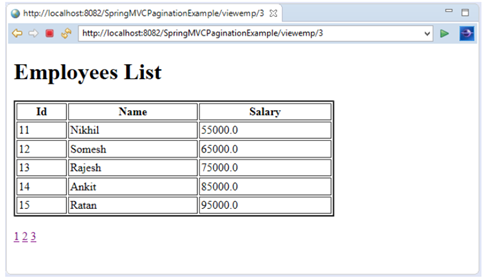
خروجی :


