مشخصات مقاله
-
425
-
0.0
-
1420
-
0
-
0
استايل يك اپليكيشن Cross-platform در زامارين
Style یک اپلیکیشن Cross-platform Xamarin.Forms
درVisual Studio 2019
دانلودsample
در این بخش شما یاد میگیرید چگونه:
- یک اپلیکیشن Xamarin.Forms Cross-platformرا با استفاده از XAML styles ، style دهی کنید.
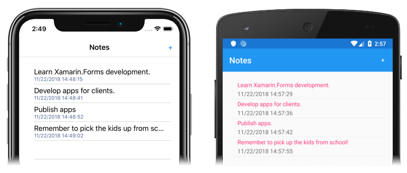
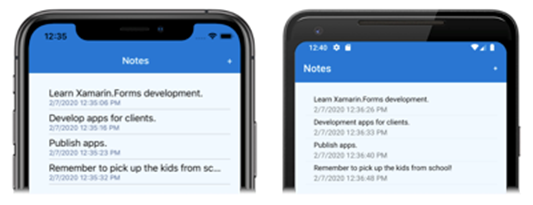
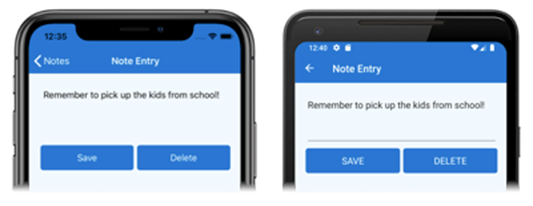
اپلیکیشن نهایی به شکل زیر خواهد بود :
![صفحه یادداشت ها صفحه یادداشت ها]()
![صفحه ورود توجه داشته باشید صفحه ورود توجه داشته باشید]()
- دیتا را به صورت Local در یک دیتا بیس SQLite.NET ذخیره کنید.
این quickstart به شما کمک میکند داده ها را در دیتابیس local SQLite.NET ذخیره کنید. اپلیکیشن نهایی به شکل زیر خواهد بود:


پیش نیاز ها:
شما باید بخش های قبلی را با موفقیت به پایان رسانده باشید و یا اینکه از sample بخش قبل برای شروع این بخش استفاده کنید.
آپدیت اپلیکیشن با Visual Studio
1. Visual Studio را باز کنید و سپس Notes solution را باز کنید.
2. در Solution Explorer، در پروژه Notes، بر App.xaml دابل کلیک کنید تا باز شود و سپس کد های موجود را حذف کنید و کد زیر را جایگزین کنید:
1 2 3 4 5 6 7 8 9 10 11 12 13 14 15 16 17 18 19 20 21 22 23 24 25 26 27 | <!--?xml version="1.0" encoding="utf-8"?--> <application xmlns="http://xamarin.com/schemas/2014/forms" xmlns:x="http://schemas.microsoft.com/winfx/2009/xaml" x:class="Notes.App"> <application.resources> <thickness x:key="PageMargin">20</thickness> <!-- Colors --> <color x:key="AppBackgroundColor">AliceBlue</color> <color x:key="NavigationBarColor">#1976D2</color> <color x:key="NavigationBarTextColor">White</color> <!-- Implicit styles --> <style targettype="{x:Type NavigationPage}"> <Setter Property="BarBackgroundColor" Value="{StaticResource NavigationBarColor}" /> <Setter Property="BarTextColor" Value="{StaticResource NavigationBarTextColor}" /> </style> <style targettype="{x:Type ContentPage}" applytoderivedtypes="True"> <Setter Property="BackgroundColor" Value="{StaticResource AppBackgroundColor}" /> </style> </application.resources> </application><button></button> |
این کد مقدار Thickness ، تعدادی مقادیر Color، style ضمنی NavigationPage و ContentPage. توجه کنید که این style ها ، که در ResourceDictionary application-level هستند، میتوانند در اپلیکیشن استفاده شوند. برای اطلاعات بیشتر درباره style ها به Styling در بررسی عمیق مراجعه کنید. تغییرات را ذخیره کنید و از فایل خارج شوید.
3. در Solution Explorer، درپروژه Notes، بر NotesPage.xaml دابل کلیک کنید تا باز شود و سپس کد های موجود را حذف کنید و با کد زیر جایگزین کنید:
1 2 3 4 5 6 7 8 9 10 11 12 13 14 15 16 17 18 19 20 21 22 23 24 | <!--?xml version="1.0" encoding="UTF-8"?--> <contentpage xmlns="http://xamarin.com/schemas/2014/forms" xmlns:x="http://schemas.microsoft.com/winfx/2009/xaml" x:class="Notes.NotesPage" title="Notes"> <contentpage.resources> <!-- Implicit styles --> <style targettype="{x:Type ListView}"> <Setter Property="BackgroundColor" Value="{StaticResource AppBackgroundColor}" /> </style> </contentpage.resources> <contentpage.toolbaritems> <toolbaritem text="+" clicked="OnNoteAddedClicked"></toolbaritem> </contentpage.toolbaritems> <listview x:name="listView" margin="{StaticResource PageMargin}" itemselected="OnListViewItemSelected"> <listview.itemtemplate> <datatemplate> <textcell text="{Binding Text}" textcolor="Black" detail="{Binding Date}"></textcell> </datatemplate> </listview.itemtemplate> </listview> </contentpage><button></button> |
این کد style های ضمنی ListView را به page-level ResourceDictionary اضافه میکند و مقدار ListView.Margin را، مقدار تعیین شده در application-level ResourceDictionary قرار میدهد. توجه کنید که style ضمنی listView به ResourceDictionary Page-Level اضافه شده است زیرا که این مقدار تنها توسط NotesPage استفاده میشود. برای اطلاعات بیشتر درباره XAML styling به Styling در بررسی عمیق مراجعه کنید.
تغییرات را ذخیره کنید و از فایل خارج شوید.
4. در Solution Explorer در پروژه Notes، بر روی NoteEntryPage.xaml دابل کلیک کنید تا باز شود. کد های موجود را حذف کنید و کد زیر را جایگزین کنید:
1 2 3 4 5 6 7 8 9 10 11 12 13 14 15 16 17 18 19 20 21 22 23 24 25 26 27 28 29 30 31 | <!--?xml version="1.0" encoding="UTF-8"?--> <contentpage xmlns="http://xamarin.com/schemas/2014/forms" xmlns:x="http://schemas.microsoft.com/winfx/2009/xaml" x:class="Notes.NoteEntryPage" title="Note Entry"> <contentpage.resources> <!-- Implicit styles --> <style targettype="{x:Type Editor}"> <Setter Property="BackgroundColor" Value="{StaticResource AppBackgroundColor}" /> </style> <style targettype="Button" applytoderivedtypes="True" cancascade="True"> <Setter Property="FontSize" Value="Medium" /> <Setter Property="BackgroundColor" Value="#1976D2" /> <Setter Property="TextColor" Value="White" /> <Setter Property="CornerRadius" Value="5" /> </style> </contentpage.resources> <stacklayout margin="{StaticResource PageMargin}"> <editor placeholder="Enter your note" text="{Binding Text}" heightrequest="100"></editor> <grid> <grid.columndefinitions> <columndefinition width="*"></columndefinition> <columndefinition width="*"></columndefinition> </grid.columndefinitions> <button text="Save" clicked="OnSaveButtonClicked"></button> <button grid.column="1" text="Delete" clicked="OnDeleteButtonClicked"></button> </grid> </stacklayout> </contentpage><button></button> |
این کد style ضمنی Editor و Button را page-level ResourceDictionary مشخص میکند و مقدار StackLayout.Margin را مقدار تعیین شده در application-level ResourceDictionary قرار میدهد. توجه کنید که style ضمنی Editor و Button در page-level ResourceDictionary اضافه شده است زیرا که این مقادیر تنها در NoteEntryPage استفاده میشوند. برای اطاعات بیشتر درباره XAML styling به Styling در بررسی عمیق مراجعه کنید. تغییرات را ذخیره کنید و از فایل خارج شوید.
5. پروژه را در پلتفرم های مختلف Build و Run کنید. برای اطلاعات بیشتر در این زمینه به بخش های قبل مراجعه کنید.
در NotesPage ، دکمه + را بزنید تا به صفحه NoteEntryPage منتقل شوید و یک یادداشت وارد کنید. در هر صفحه توجه کنید که style از بخش های قبل متفاوت است.
برای Visual Studio for Mac
دانلودsample
در این بخش شما یاد میگیرید چگونه:
- یک اپلیکیشن Xamarin.Forms Cross-platformرا با استفاده از XAML styles ، style دهی کنید.
اپلیکیشن نهایی به شکل زیر خواهد بود :
![صفحه یادداشت ها صفحه یادداشت ها]()
![صفحه ورود توجه داشته باشید صفحه ورود توجه داشته باشید]()
- دیتا را به صورت Local در یک دیتا بیس SQLite.NET ذخیره کنید.
پیش نیاز ها:
شما باید بخش های قبلی را با موفقیت به پایان رسانده باشید و یا اینکه از sample بخش قبل برای شروع این بخش استفاده کنید.
آپدیت اپلیکیشن با for Mac Visual Studio
1. Visual Studio for Mac را باز کنید و سپس پروژه Notes را باز کنید.
2. در Solution Pad، در پروژه Notes، بر App.xaml دابل کلیک کنید تا باز شود و سپس کد های موجود را حذف کنید و کد زیر را جایگزین کنید:
1 2 3 4 5 6 7 8 9 10 11 12 13 14 15 16 17 18 19 20 21 22 23 24 25 26 27 | <!--?xml version="1.0" encoding="utf-8"?--> <application xmlns="http://xamarin.com/schemas/2014/forms" xmlns:x="http://schemas.microsoft.com/winfx/2009/xaml" x:class="Notes.App"> <application.resources> <thickness x:key="PageMargin">20</thickness> <!-- Colors --> <color x:key="AppBackgroundColor">AliceBlue</color> <color x:key="NavigationBarColor">#1976D2</color> <color x:key="NavigationBarTextColor">White</color> <!-- Implicit styles --> <style targettype="{x:Type NavigationPage}"> <Setter Property="BarBackgroundColor" Value="{StaticResource NavigationBarColor}" /> <Setter Property="BarTextColor" Value="{StaticResource NavigationBarTextColor}" /> </style> <style targettype="{x:Type ContentPage}" applytoderivedtypes="True"> <Setter Property="BackgroundColor" Value="{StaticResource AppBackgroundColor}" /> </style> </application.resources> </application><button></button> |
این کد مقدار Thickness ، تعدادی مقادیر Color، style ضمنی NavigationPage و ContentPage. توجه کنید که این style ها ، که در ResourceDictionary application-level هستند، میتوانند در اپلیکیشن استفاده شوند. برای اطلاعات بیشتر درباره style ها بهStyling در بررسی عمیق مراجعه کنید. تغییرات را ذخیره کنید و از فایل خارج شوید.
3. در Solution Pad ، در پروژه Notes، بر NotesPage.xamlدابل کلیک کنید تا باز شود. سپس کد های موجود را حذف کنید و کد زیر را جایگزین کنید:
1 2 3 4 5 6 7 8 9 10 11 12 13 14 15 16 17 18 19 20 21 22 23 24 | <!--?xml version="1.0" encoding="UTF-8"?--> <contentpage xmlns="http://xamarin.com/schemas/2014/forms" xmlns:x="http://schemas.microsoft.com/winfx/2009/xaml" x:class="Notes.NotesPage" title="Notes"> <contentpage.resources> <!-- Implicit styles --> <style targettype="{x:Type ListView}"> <Setter Property="BackgroundColor" Value="{StaticResource AppBackgroundColor}" /> </style> </contentpage.resources> <contentpage.toolbaritems> <toolbaritem text="+" clicked="OnNoteAddedClicked"></toolbaritem> </contentpage.toolbaritems> <listview x:name="listView" margin="{StaticResource PageMargin}" itemselected="OnListViewItemSelected"> <listview.itemtemplate> <datatemplate> <textcell text="{Binding Text}" textcolor="Black" detail="{Binding Date}"></textcell> </datatemplate> </listview.itemtemplate> </listview> </contentpage><button></button> |
این کد style های ضمنی ListView را به page-level ResourceDictionary اضافه میکند و مقدار ListView.Margin را، مقدار تعیین شده در application-level ResourceDictionary قرار میدهد. توجه کنید که style ضمنی listView به ResourceDictionary Page-Level اضافه شده است زیرا که این مقدار تنها توسط NotesPage استفاده میشود. برای اطلاعات بیشتر درباره XAML styling به Styling در بررسی عمیق مراجعه کنید. تغییرات را ذخیره کنید و از فایل خارج شوید.
4. در Solution Pad، در پروژه Notes، بر NotesEntryPage.xaml دابل کلیک کنید تا باز شود. سپس کد های موجود را حذف کنید و کد زیر را جایگزین کنید:
1 2 3 4 5 6 7 8 9 10 11 12 13 14 15 16 17 18 19 20 21 22 23 24 25 26 27 28 29 30 31 | <!--?xml version="1.0" encoding="UTF-8"?--> <contentpage xmlns="http://xamarin.com/schemas/2014/forms" xmlns:x="http://schemas.microsoft.com/winfx/2009/xaml" x:class="Notes.NoteEntryPage" title="Note Entry"> <contentpage.resources> <!-- Implicit styles --> <style targettype="{x:Type Editor}"> <Setter Property="BackgroundColor" Value="{StaticResource AppBackgroundColor}" /> </style> <style targettype="Button" applytoderivedtypes="True" cancascade="True"> <Setter Property="FontSize" Value="Medium" /> <Setter Property="BackgroundColor" Value="#1976D2" /> <Setter Property="TextColor" Value="White" /> <Setter Property="CornerRadius" Value="5" /> </style> </contentpage.resources> <stacklayout margin="{StaticResource PageMargin}"> <editor placeholder="Enter your note" text="{Binding Text}" heightrequest="100"></editor> <grid> <grid.columndefinitions> <columndefinition width="*"></columndefinition> <columndefinition width="*"></columndefinition> </grid.columndefinitions> <button text="Save" clicked="OnSaveButtonClicked"></button> <button grid.column="1" text="Delete" clicked="OnDeleteButtonClicked"></button> </grid> </stacklayout> </contentpage><button></button> |
این کد style ضمنی Editor و Button را page-level ResourceDictionary مشخص میکند و مقدار StackLayout.Margin را مقدار تعیین شده در application-level ResourceDictionary قرار میدهد. توجه کنید که style ضمنی Editor و Button در page-level ResourceDictionary اضافه شده است زیرا که این مقادیر تنها در NoteEntryPage استفاده میشوند. برای اطاعات بیشتر درباره XAML styling به Styling در بررسی عمیق مراجعه کنید. تغییرات را ذخیره کنید و از فایل خارج شوید.
5. پروژه را در پلتفرم های مختلف Build و Run کنید. برای اطلاعات بیشتر در این زمینه به بخش های قبل مراجعه کنید.
در NotesPage ، دکمه + را بزنید تا به صفحه NoteEntryPage منتقل شوید و یک یادداشت وارد کنید. در هر صفحه توجه کنید که style از بخش های قبل متفاوت است.


